The document bundles you create on EIN can be quickly transformed into fully paginated and indexed Microsoft Word documents, complete with a Tribunal-style front page. This automated process is efficient and saves hours of manual work. Best of all, you can work within the familiar environment of Microsoft Word—no need to learn any clunky new software.
If you need to comply with electronic bundle requirements, you can also easily save your finished bundle as a PDF file. This ensures compatibility with Tribunal and court requirements for submission.
This guide covers the following:
Downloading the Microsoft Word Bundle-Maker add-in
Creating a bundle in Microsoft Word
Options for formatting and editing your bundle
Downloading the Microsoft Word Bundle-Maker Add-In
To create a bundle in Microsoft Word, you first need to download and install the Microsoft Word Bundle-Maker add-in. This is a one-time setup, and once installed, the Bundle-Maker will always be available on your computer.
You can find full installation instructions here. Important: Make sure Microsoft Word is closed before installing the add-in. Once installed, you’ll find the Bundle-Maker on a custom ribbon within Word.
Creating a Bundle in Microsoft Word
To get started, make sure you’ve reviewed the guide available here and either:
- Exported your bundle to a DOC Word document, or
- Copied and pasted the HTML export of your bundle into Word.
From there, you can customize your bundle further by:
- Adding your own text and Word documents
- Adding PDF files to the bundle
- Including scanned or printed documents
- Reordering items within the bundle
- Creating a schedule of essential reading by highlighting key passages
This guide focuses on the basics of creating a fully paginated and indexed bundle.
Important Note: To avoid losing work, always save your bundle before running the Bundle-Maker. While Microsoft Word is good at recovering documents, saving ensures you won’t lose progress if something unexpected happens.
To launch the Bundle-Maker, open the custom ribbon in Word and click the 'Create/Undo Bundle' button:

The Bundle-Maker dialog appears, giving you various formatting and editing options. You can:
- Enter the appellant’s name and appeal number.
- Specify the starting page number for pagination (default is page 1).
- Choose whether to paginate the contents pages separately in Roman numerals (i, ii, iii). This is helpful if you plan to edit the contents pages, as it prevents changes from affecting the pagination of the main bundle.
When ready, click the 'Create Bundle' button. The Bundle-Maker will automatically generate a fully formatted, paginated, and indexed bundle in seconds.

If your bundle contains PDF files, or if you need to save your bundle as PDF file to comply with court or tribunal bundle requirements, you’ll need to use the PDF Bundle-Compiler as a final step. Learn more about compiling and saving PDF bundles here.
Options for Formatting and Editing Your Bundle
The Bundle-Maker provides 'Format' and 'Edit' tabs to customize your bundle:
Format Tab
Control the font and formatting of your bundle to meet specific requirements. For example, you can set Times New Roman, 12-point font with 1.5 line spacing to comply with First-tier Tribunal rules introduced in November 2024.

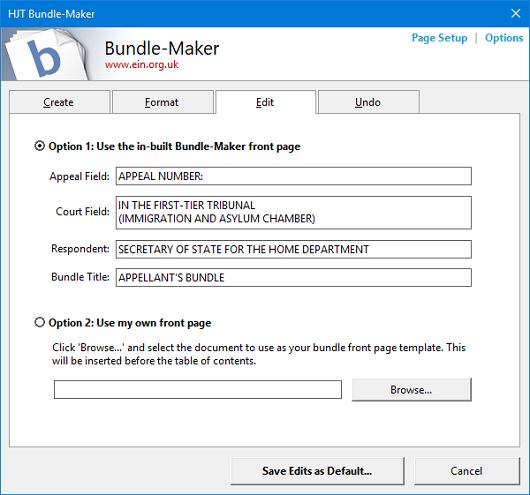
Edit Tab
Edit the text on the default Tribunal-style front page or replace it with a custom front page by uploading your own Word document.

The default front page reads:
'IN THE FIRST-TIER TRIBUNAL (IMMIGRATION AND ASYLUM CHAMBER)'

You can save your customized settings on both tabs as defaults for future bundles.
Further Options
Click the 'Options' command in the top right corner of the Bundle-Maker for additional settings:

If you have any suggestions for additional features, email us at hjt@ein.org.uk, and we’ll do our best to incorporate your feedback.